With the right tools, it's possible to export your Shopify data out of Shopify and to a remote location. You can export your Shopify products, collections, customers, orders, activity, and shop directly into the likes of Google Drive, Dropbox, Amazon S3, or any of the other 30+ supported storage platforms via SFTP by using Couchdrop.
How to export Shopify data to cloud storage with Couchdrop
Exporting Shopify data involves combining Couchdrop's cloud SFTP and the Matrixify app, a tool to help you manage your Shopify store data by bulk importing and exporting human-readable Excel and CSV files.
The process involves some minor configuration in both tools to set up the connection.
- Step 1 - Connect your cloud storage destination to Couchdrop
- Step 2 - Create a new SFTP user to connect to the above location
- Step 3 - Add the Matrixify app to your Shopify account
- Step 4 - Configure SFTP in Matrixify
- Step 5 - Configure Export to SFTP connection
Step 1. Connect your cloud storage destination to Couchdrop
First, you need to connect the storage platform to Couchdrop that you want to use as the destination. In this case, we will use a Team Dropbox account as an example. However, you can use any of the storage integrations as your destination, and the process is similar across all of them.
To connect a storage platform, choose to connect to storage and find your platform in the list; Dropbox Team in this example. Give the integration an internal name and name the virtual folder for how it will appear in Couchdrop.
For instance, if you call the Couchdrop folder Shopify and link it to a folder called [Your Shopify store name] in Dropbox, adding files to the Shopify folder is the same as adding them directly to the [Your Shopify store name] folder in Dropbox, as Couchdrop is connecting directly to your Dropbox account.
Dropbox and most other integrations use OAuth to connect, which only takes seconds to authorize.
Step 2 - Create a new SFTP user
Next, you need to create an SFTP user. This user will be added to your Matrixify configuration, and you'll be authorizing the connection there as this user.
One essential feature of Couchdrop is that you can create SFTP users who can interact with folders in your storage integrations. What this means is that they can connect via SFTP to your Shopify folder (which is a direct connection to Dropbox), so they can access Dropbox via SFTP.
This bridge is what allows you to export your Shopify data directly to cloud storage.
To create a new SFTP user in Couchdrop, choose to add a new user. You can customize the details or have Couchdrop autogenerate the user with pre-configured permissions. Since this user will only be used in the Matrixify configuration, the default SFTP permissions should suit.
If you set the folder you want to export your Shopify data to as the user's root, you can simply connect to the root folder when configuring your export.
Record the username and password for use in the next steps.
Step 3 - Add the Matrixify app to your Shopify
Matrixify integrates directly with Shopify, allowing you to import and export data in the correct formats for Shopify. This is a paid tool with plans based on the size of the store.
You can view Matrixify pricing here and install the app from the Shopify app Store.
Step 4 - Configure SFTP in Matrixify
Once you've added the Matrixify app, navigate to settings and scroll down to servers. You'll need to set the fields below to ensure a successful connection.
Set the following:
- Name — a name you can identify the connection as (Like "Dropbox")
- Server Type — SFTP
- Host — Your server hostname. yourhostname.couchdrop.io . You can find your hostname details and information for connecting as a specific user by clicking the cloud icon on the top of any page.
- Port — 22
- Authentication Method — Password (unless you've configured RSA Keys in Couchdrop)
- User — The name of the user you created in Step 2.
- Password — The password for the user you created in Step 2.
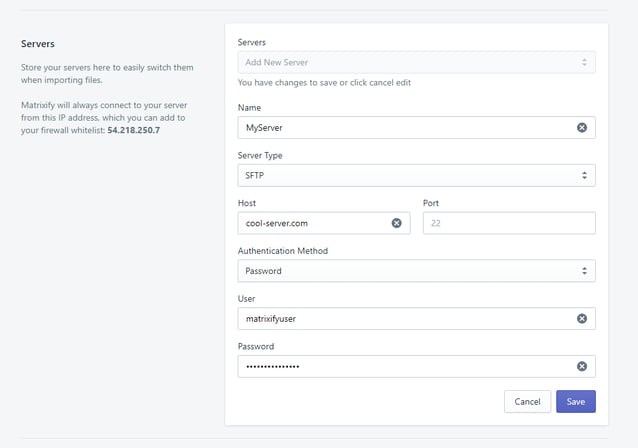
The connection will successfully save if the above is correct.
Remember that since this user points to a Dropbox folder, you are connecting directly to Dropbox via SFTP by setting up this connection.
Step 5. Configure Export to SFTP connection
Create an Export under the Matrixify dashboard. Complete the details for scheduling (if you want to run this export on a schedule) and any other settings you'd like.
For uploading to cloud storage, the important field is the Upload to: field. Choose the name you chose for the server connection in Step 4. If you want to export to the user's subfolder, specify that parth as well.
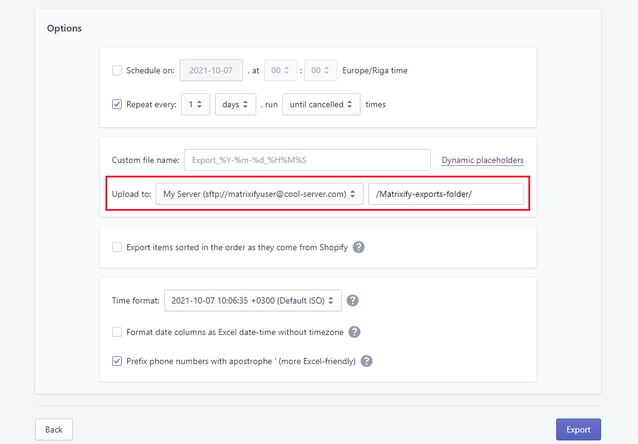
When you're finished, click Export and you should see the export progress through stages and then complete successfully. You can confirm in the Dropbox folder that the Export arrived and can run multiple exports as needed without having to configure additional settings in Couchdrop.
Try Couchdrop free for 14 days
Couchdrop is a simple cloud SFTP file transfer platform that just works. By integrating with cloud storage, you can export Shopify data via SFTP directly to cloud storage with no temporary storage or manual intermediary steps required.
To try this process for yourself, sign up for a Couchdrop account. All new regirstrations get a 14-day free trial with instant access and no credit card required. Sign up now to get started.